.jpeg)
Shadows of a thousand years rise again unseen, voices whisper in the trees, “Tonight is Halloween!” – Dexter Kozen
Every year the IMPO ladies try to come up with a costume that’s better than the last; try to outdo ourselves with wigs, clothing and of course, makeup!
Sometimes envisioning our Halloween costume is easier than the actual execution so the IMPO Pros thought we would post a few easy to follow, step-by-step instructions on how to replicate some classic and current popular characters.
We hope this helps you get into the spirit of the season and solve any dilemmas of trying to decide “what” or “who” to be for Halloween!
Mad Hatter Johnny Depp Version 1: “No wonder you’re late, this watch is exactly two days slow!” If you are as mad as a hatter then you will love both our versions of this character!

Step 1: Prime face!
Step 2: Foundation - using a foundation brush or dampened sponge, apply Ben Nye Crème makeup in white all over the face, neck, ears, chest or wherever you have exposed skin. You can find Ben Nye products (or similar items) in beauty supply stores, online, and at stage makeup and theatre stores for as little as $4.50 each.

Step 3: Contour - create a heavy contour with a deep burgundy blush in hallows of the cheeks, along the sides of the nose and nasal labial folds, jaw line and lightly at temples and sculpt cheekbones.
Step 4: Eyes - using Make Up Forever Aqua Cream #7 Fuchsia apply under the eye where natural under-eye circles would appear. Taking the same deep burgundy blush color from Step 3, apply under the eye in the outer corner and smudge (see picture above for reference). Switch to a clean brush and apply Make Up Forever Aqua Cream #20 Intense Blue to lid and crease and blend. Using a grey colored eyeliner pencil, line the lower water line. For white eyelashes either apply colored false lashes or try Make Up For Ever’s Lash Fibers
 , which dries white on lashes.


Step 5: Lips – for a made to last mad hatter pout, try using a long wear lipstick and complimentary lip liner, like M.A.C. Pro Long Wear Lip Crème in Faithfully Yours and to make certain that your color lasts all thru the night, blot after first application and reapply! If you find that the color is too dark for your taste, lighten it up with a pinker toned hue.

Step 6: Set - using a large, fluffy powder brush or powder puff, set the makeup with a translucent powder like Make Up Forever HD Powder or RCMA powder. To really secure your makeup spritz your face with Cinema Secrets Super Sealer Spray
 .
.
Tip: if you have the orange wig and top hat, but no hair for eyebrows, try carefully snipping a few fibers off the end the wig and attach to eyebrows with Duo Lash Glue !
!
Mad Hatter Version 2:

Step 1: Prime (same as above).
Step 2: Foundation – instead of the white face Hatter above, switch to a very light cream foundation and apply all over face, neck, ears and other exposed skin, including the lips.
Step 3: Set – using the same powder above and application method, create a totally matte finish on the skin.
Step 4: Brows – using a dark (black) eyebrow or liner pencil, fill in and thicken brows and exaggerate and elongate.
Step 5: Contour – using a bronzer or taupe eye shadow, contour and sculpt cheekbones and nose.
Step 6: Eyes – from lid to brow apply Bobbi Brown Long-Wear Cream Shadow in Shore. Line upper lash line with liquid liner and flick up at outer corners, use a black eye shadow to darken the liquid liner and smudge that same color under lash line. Using a black kohl eyeliner, line the upper and lower water line. Apply false lashes to both the upper and lower lash line and use mascara. The more dramatic the false lash the better so get creative!
Step 7: Lips – using a dark plum lip liner, round the cupid’s bow and create a “heart” shape on the lip, fill in. Using a coordinating lipstick or gloss, paint the “heart” shape and blot. Reapply for stain effect.
Zombie Version 1: As Vincent Price chants in Thriller, “Darkness falls across the land, the midnight hour is close at hand, creatures crawl in search of blood, to terrorize your neighborhood!”
Step 1: Foundation – apply Bobbi Brown Stick Foundation in a very light stick color all over the face, neck, hands, ears and whatever skin may be showing.

Step 2: Contour – using Mehron Fantasy FX grey cream color, lightly hollow out the cheekbones, eye sockets, under eye area where dark circles would naturally appear, nose holes, neck and in the natural hollow areas of the clavicle. Contour sides of the nose and jaw line and darken the insides of the ear.

Step 3: Eyes – using a red cream color smudge lightly under eyes and blend (see example photo above). Use a red lip pencil to line the inner rim of the eye as well as top and bottom of your lid for the undead eye look and/or apply and smudge black eyeliner pencil to top and bottom eye area (remember, you are not concerned about neatness). Smudge black slightly into the socket area. Apply mascara if you are so inclined and if you really want to create an undead appearance, smear that mascara a little with your fingers.
Step 4: Lips – either go for glamour and use a red lipstick or go for gross and apply black pencil or lipstick onto the lips, the choice is yours.
Step 5: Veins – using a Ben Nye Bruise Wheel (see photo below) and a very thin eyeliner brush, draw veins near eye socket, down neck, nostrils, on forehead, cheeks, chest, corner of mouth, chin. Veins are light purple/blue tones.

Step 6: Set – using a translucent, loose powder and a powder puff, lightly stipple powder on to set all the makeup. Reapply veins if color appears to have dulled because of the powder, but make sure to reset any cream colors you are using.
Step 7: Blood - add some theatrical stage blood in a gel form here, there and everywhere, and you’re ready for a night of haunting the streets! We recommend Ben Nye Thick Blood .
.

Zombie Version 2:

Step 1 and Step 2: same as above.
Step 3: Set – using a translucent powder and a large, fluffy powder brush.
Step 4: Eyes – only using a black powder eye shadow, apply all over lid, contour and blend up to brow bone. Also apply under eye (think skeleton eyes when hallowing out the under eye area and socket). Using a blue eyeliner pencil or gel liner, line the bottom, inner water line.
Step 5: Lips – using the same black shadow, smudge on to the lips. The natural dryness of the powder shadow will settle into the fine lines of the lips making them appear deathly.
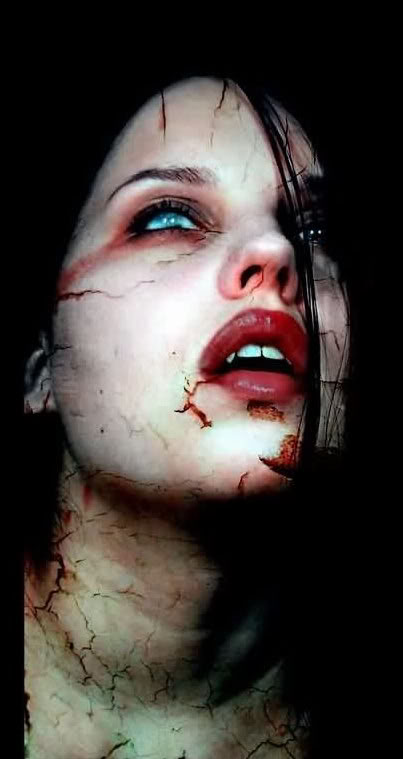
Vampire: The IMPO Pros are totally team Edward, however we prefer our vampires to be a little gritty a la True Blood! Vampire or Dracula makeup has to be one of the easiest to replicate because you can apply “old school” style or glamorize it for modern times!


Step 1: Prime the face and neck.
Step 2: Foundation – using either a white cream based foundation or a very light, porcelain skin toned, matte foundation (like those listed on previous looks above). Apply with a sponge or synthetic makeup brush all over face, ears, lips, neck and blend. You can reapply to build coverage.
Step 2: Contour – For Dracula, use a light grey cream color base, hallow out cheekbones and temples. Contour sides of nose and jaw line and blend. For Edward Cullen, set foundation first with powder and then use a light taupe colored, matte eye shadow or very light bronzer for contour.
Step 3. Set – using a translucent loose powder, set cream or liquid makeup with brush or puff.
Step 4: Brows – using a black pencil or powder, darken and fill in brows. For old school, Dracula, over exaggerate and elongate brows. You can also use a dark brown if the black color feels too dramatic.
Step 5: Eyes – For Edward Cullen, use a vanilla, neutral toned, matte eye shadow from lid to brow and blend. Use the same light taupe eye shadow mentioned in Step 2 to lightly line the upper and bottom eye area to create a smoldering effect. Apply Vainglorious, a burgundy powder shadow from M.A.C.’s Venomous Villains collection under the eye area where natural dark circles would develop and blend. For old school Dracula, use a combination of the burgundy eye shadow and a dark grey, matte shadow on lid, crease and under eye area and blend. Keep the brow area clean and sculpted. Drag dark colors into the inner eye socket. Line the inside of the bottom water line with a black kohl pencil.

Step 6: Lips – using Ben Nye Lip Color in Natural, apply to lips and blot for stained effect (use a deeper version on Dracula if desired). Add some theatrical stage blood dripping down corners of the mouth for Dracula and puncture marks on the neck for added drama and don’t forget your fangs!

Step 7: Veins – for the Dracula character use a burgundy lip pencil, draw veins near temple, under check bone, across forehead and darken in the cleft of the chin. Set all makeup again with loose powder.
Cruella De Vil (Glenn Close) Version 1: "Cruella De Vil, Cruella De Vil, if she doesn’t get you, no evil thing will…"

Step 1: Prime the skin!
Step 2: Foundation – using a light, matte cream or liquid foundation, the Pros love Chanel Mat Lumiere Foundation and set with loose, translucent powder.

Step 3: Brows – darken and thicken brows with pencil or powder and elongate brows outward for drama.
Step 4: Eyes – apply Smashbox Shimmer Shadow in Ambient from lid to brow and extend outward following the overdrawn brows and blend into cat eye angle. Using liquid, black liner or gel on both the upper and lower lash line and extend outward, but do not connect the lines in the out corners. Apply false lashes.

Step 5: Contour – using a light, powder bronzer, contour cheekbones and blend onto temples and jaw line.
Step 6: Lips – using a true red lip liner and matte lipstick, fill in and overdraw lips. Blot and reapply for long lasting staying power! The Pros recommend Lipstick Queen Red Sinner for this character.

Cruella De Vil Version 2:

Step 1 and Step 2: follow the same as above.
Step 3: Brows – using Ivory soap and a baby toothbrush, erase natural brows by dampening the toothbrush with Evian Spritzer and rubbing it into the soap. Tack down the brows and let dry. Set with translucent powder and apply a white cream eye shadow on top of brows. Then using a dark brown brow pencil from Anastasia’s collection, draw a thin brow above your natural brow line and set again with loose powder.

Step 4: Eyes – using Bobbi Brown Long-Wear Cream Shadow in Shore, apply to lid and crease and blend into the white cream shadow to diffuse any lines of demarcation. Line upper lash line with liquid liner and flick at outer corners. Apply false lashes to upper and lower lash lines.

Step 5: Contour – using same method and product listed above.
Step 6: Lips – again the Pros recommend Lipstick Queen Red Sinner to complete this modern day Cruella look.
PRO TIPS AND TRICKS:
If you are in a pinch for time, try the new Halloween Beauty in a Box kits sold at Sephora. They include all the products you need with instructions on how to create a Vampire, Sexy Kitten, Peacock, or Vegas Showgirl. Best part is, they are only $26!


